
Website Badge Generator: How to Build and Embed Yours
You've got the badge drafted, the footer slot picked, and the annoying part is still unsolved: the thing needs to look right on the page. That's where a website badge generator earns its keep. It's less a single tool than a small pipeline that turns a label, a style, and a destination into something you can ship without hand-building every variant.
Table of Contents
- What a Website Badge Generator Actually Does
- The Four Badge Types and Which One You Need
- Choosing a Generator and Configuring the Output
- Picking the Right Output Format
- Embedding the Badge Without Breaking the Page
- Where Badges Help and Where They Hurt
- Putting the Pipeline Together
What a Website Badge Generator Actually Does

A founder sees a scan result from an AI website detector and wants a small “Detected by” badge in the footer. A marketer wants a “Built with” badge that doesn't look slapped on. A developer wants the same asset to work in a WordPress footer, a Webflow embed, and a GitHub README without redesigning it three times.
That's the actual job of a website badge generator. It takes a badge idea, turns it into artwork or code, and prepares it for the place where it will live. The useful framing is a four-stage pipeline, define, generate, issue, embed, because the output only makes sense when you know the destination first.
Practical rule: the generator is the easy part, the embed target decides whether the badge works.
A useful example is the basic website badge workflow described in the browser-side guide for adding badges to a site, where the asset is generated first and then dropped into a page with a simple image tag. That same pattern is why the gap between an image badge and an embed-code badge trips up beginners. They look similar in a preview, but they behave very differently once they land in a live footer or sidebar. For a related builder example, see this website builder detection page.
The rest of this article stays focused on what is needed in production. It covers which badge type fits which job, how to choose a generator, how to pick between SVG, PNG, and HTML/CSS, and how to embed the result without wrecking layout, accessibility, or trust.
The Four Badge Types and Which One You Need
A lot of search traffic around website badge generator gets mixed together because four different badge problems often wear the same label. That confusion creates the most common mistake in the space, people generate a polished graphic before they've decided what the badge is supposed to prove.
Website badge categories at a glance
| Category | Typical Output | Common Placement | What It Signals |
|---|---|---|---|
| Trust badge | PNG, SVG, or HTML/CSS snippet | Checkout, cart, footer, pricing page | Security, payment trust, or policy reassurance |
| Tech-stack badge | Image or embeddable code | Footer, homepage, “built with” page | Platform, builder, or implementation identity |
| Credential badge | Portable badge metadata and image | Profile, learner page, verifier page | Verifiable achievement or completion |
| Logo or badge-art generator | PNG or SVG artwork | Website graphics, merchandise, social assets | Brand mark, decorative mark, or campaign art |
Trust badges and tech-stack badges look similar on the page, but they answer different visitor questions. A trust badge says, “Can I feel safe here?” A tech-stack badge says, “What powers this site?” A credential badge follows the Open Badges model, which was introduced in 2011 by the Mozilla Foundation and the MacArthur Foundation and later adopted by IMS Global Learning Consortium for interoperable credentials, so it carries structured metadata for portable verification VirtualBadge on Open Badges. A logo or badge-art generator is different again, because it's usually about visual identity, not verification.
The cleanest way to choose is to start with the question the visitor needs answered. If the badge is meant to reassure, you're in trust-badge territory. If it's meant to identify the stack, you need a tech badge. If it must verify completion or credentials across platforms, you need Open Badges support, not just a pretty icon.
For a separate breakdown of the badge-builder category, the taxonomy around website badge generators and builders is a useful reminder that the search term is broader than one product shape. Picking the category first keeps you from shipping a decorative PNG that looks official but proves nothing.
Choosing a Generator and Configuring the Output
The best generator depends on whether you want custom art, a quick template, or a no-account static tool. I've wired all three into real sites, and each one wins in a different situation.
Pick the generator style that matches the job
AI badge generators work well when the badge needs a specific tone, because they start from a prompt instead of a fixed layout. NightCafe's badge tool asks for purpose, style, colors, and symbols, then generates multiple designs for download, which is useful when you want options before you commit NightCafe badge generator. Template-driven builders are faster when the badge is mostly functional, because you can fill in the details and get an export path quickly. BuildTheIdea's workflow is especially concrete, it asks for domain and destination URL first, then style and icon, then an HTML or Markdown snippet for the footer BuildTheIdea badge generator.
Self-hosted static generators have their own appeal. One free SVG badge generator says it's hosted on GitHub Pages and available without cost or a personal account, which makes it easy to spin up a badge without onboarding friction free SVG badge generator.
The configuration fields that matter most are the ones that affect placement later, not just appearance:
- Badge label text: this should be short enough to stay legible in a narrow footer or sidebar.
- Destination URL: this defines where the badge points, so it should be meaningful and stable.
- Icon or symbol: this changes whether the badge reads as a trust signal, a product mark, or a credential.
- Color palette: this decides whether the badge disappears into the UI or stands out too loudly.
- Output dimensions: this matters because a badge that looks fine in a preview can break when the embed area is tight.
A badge generator is really a decision funnel. The more clearly you define label, icon, and destination up front, the less cleanup you do after export.
The product-level pattern that works best is simple. Define the badge text first, choose the destination URL next, then generate the art or snippet, and only then decide where it gets issued. That keeps the asset aligned with the page, instead of forcing the page to absorb a generic graphic.
Picking the Right Output Format
The format should be driven by the destination, not by the generator's default export. That sounds obvious, but in practice people keep the first file the tool gives them and then wonder why the badge looks fuzzy, oversized, or impossible to style.
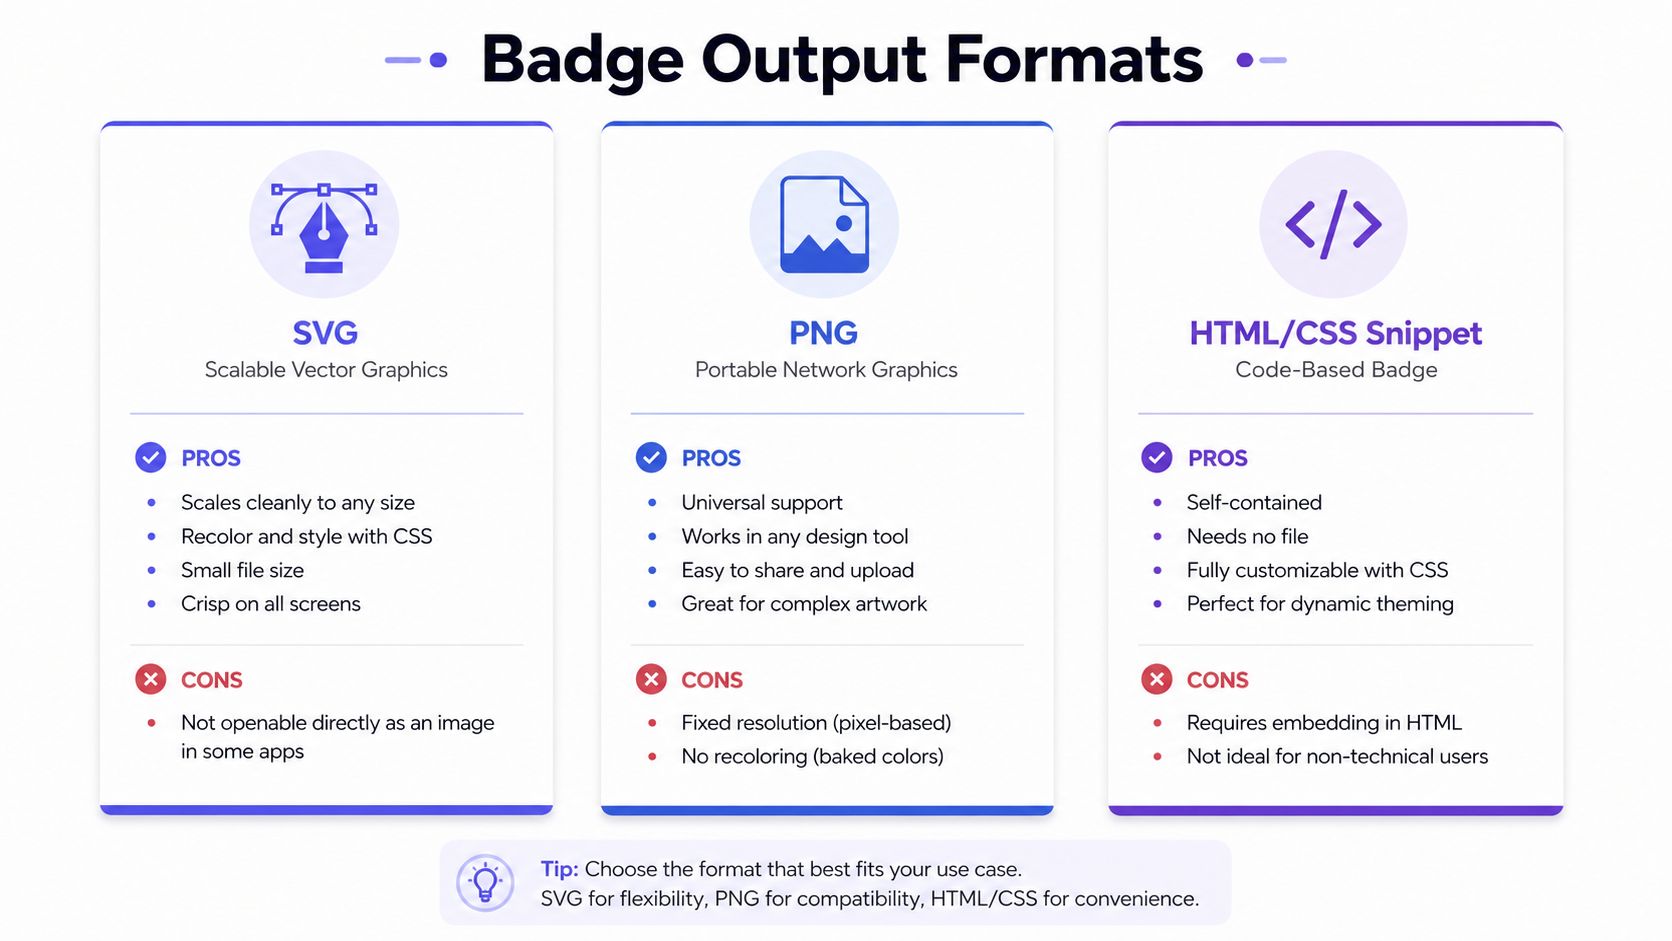
SVG fits when the badge needs flexibility
SVG is the best option when you want a badge that scales cleanly in responsive layouts. It stays crisp on high-density screens, and it can be recolored with CSS when the generator exposes the right hooks. The downside is practical, not theoretical, some teams can't open SVGs in older image editors, so the asset may need a different workflow before upload.
The output guidance in Open Badges tooling also leans toward compact, standardized artwork rather than arbitrary dimensions, with one creator recommending 500×500 px PNG output and batch generation from CSV/XLSX or API/Zapier automation VirtualBadge creator guidance. A separate guideline set recommends 200×200 px icons with a transparent PNG and white iconography, which is a good reminder that badge art should be prepared as a design asset, not just a screenshot.
PNG still wins for broad compatibility
PNG is the safest universal format when the badge needs to upload anywhere without fuss. It's easy to place in a CMS, a docs repo, or a page builder, and it behaves predictably in most environments. The trade-off is that PNG locks the design at a fixed pixel size, so it can look soft or awkward if the embed area changes later.
If you're comparing raster choices more broadly, this format workflow guide is useful background for the practical differences between image types. For badges, the core rule stays the same, use PNG when portability matters more than styling control.
HTML/CSS snippets suit site embeds
HTML/CSS snippets are the most useful when the badge needs to live directly inside a site footer, checkout block, or product page. VouchView's trust badge generator says its snippet works across Shopify, WordPress, Webflow, and custom code, which makes it a strong fit for teams that need one portable embed VouchView trust badge generator.
A snippet is also the format most likely to clash with existing site styles if it isn't self-contained. That's why many teams keep badge styling isolated, then paste the block into the target partial or template. If you're tuning visual treatment alongside the badge, MerchLoom's overlay workflow is a helpful reference for how layered assets behave once they're composited into a final design.
Embedding the Badge Without Breaking the Page
The cleanest embed pattern depends on whether you're placing an image, a Markdown badge, or a self-contained snippet. Each one belongs somewhere different, and each one has a different failure mode if you paste it in blindly.
Use the right markup for the right surface
For a plain image badge that should open a destination in a new tab, wrap the image in an anchor and keep the alt text descriptive:
<a href="https://example.com" target="_blank" rel="noopener noreferrer"> <img src="https://example.com/badge.svg" alt="Website badge showing verified scan result for Example" /> </a>
That pattern keeps the badge clickable, helps with accessibility, and avoids leaking unnecessary referrer data. For a repository badge or documentation badge, Markdown stays simpler:
[](https://example.com)
When the generator gives you a self-contained HTML/CSS snippet, paste it into the right template location rather than trying to rebuild it by hand. That usually means a footer partial, a checkout template, a product page section, or a custom embed block depending on the platform.
Place the snippet where the page already expects trust markers
The practical advantage of a self-contained snippet is portability. VouchView's generated HTML/CSS is meant to be dropped into Shopify, WordPress, Webflow, and custom code without rewriting the badge logic VouchView trust badge generator. That portability matters more than is commonly expected, because footer components, sidebar widgets, and checkout templates all behave differently.
For teams working inside stricter site architectures, the markup also has to respect existing policies. This content security guidance for badge builders is a useful reminder that even a harmless-looking badge can fail if the embed rules are too tight. When that happens, the issue is usually not the badge art, it's the surrounding template or policy layer.
Practical rule: if the badge is meant to be clicked, make the click target obvious. If it's meant to reassure, don't bury it inside a noisy cluster of other elements.
The last detail is accessibility. The alt text should name the badge and what it links to, not just say “badge” or “logo.” That small choice makes the element understandable when the image fails to load or when a screen reader has to announce it.
Where Badges Help and Where They Hurt
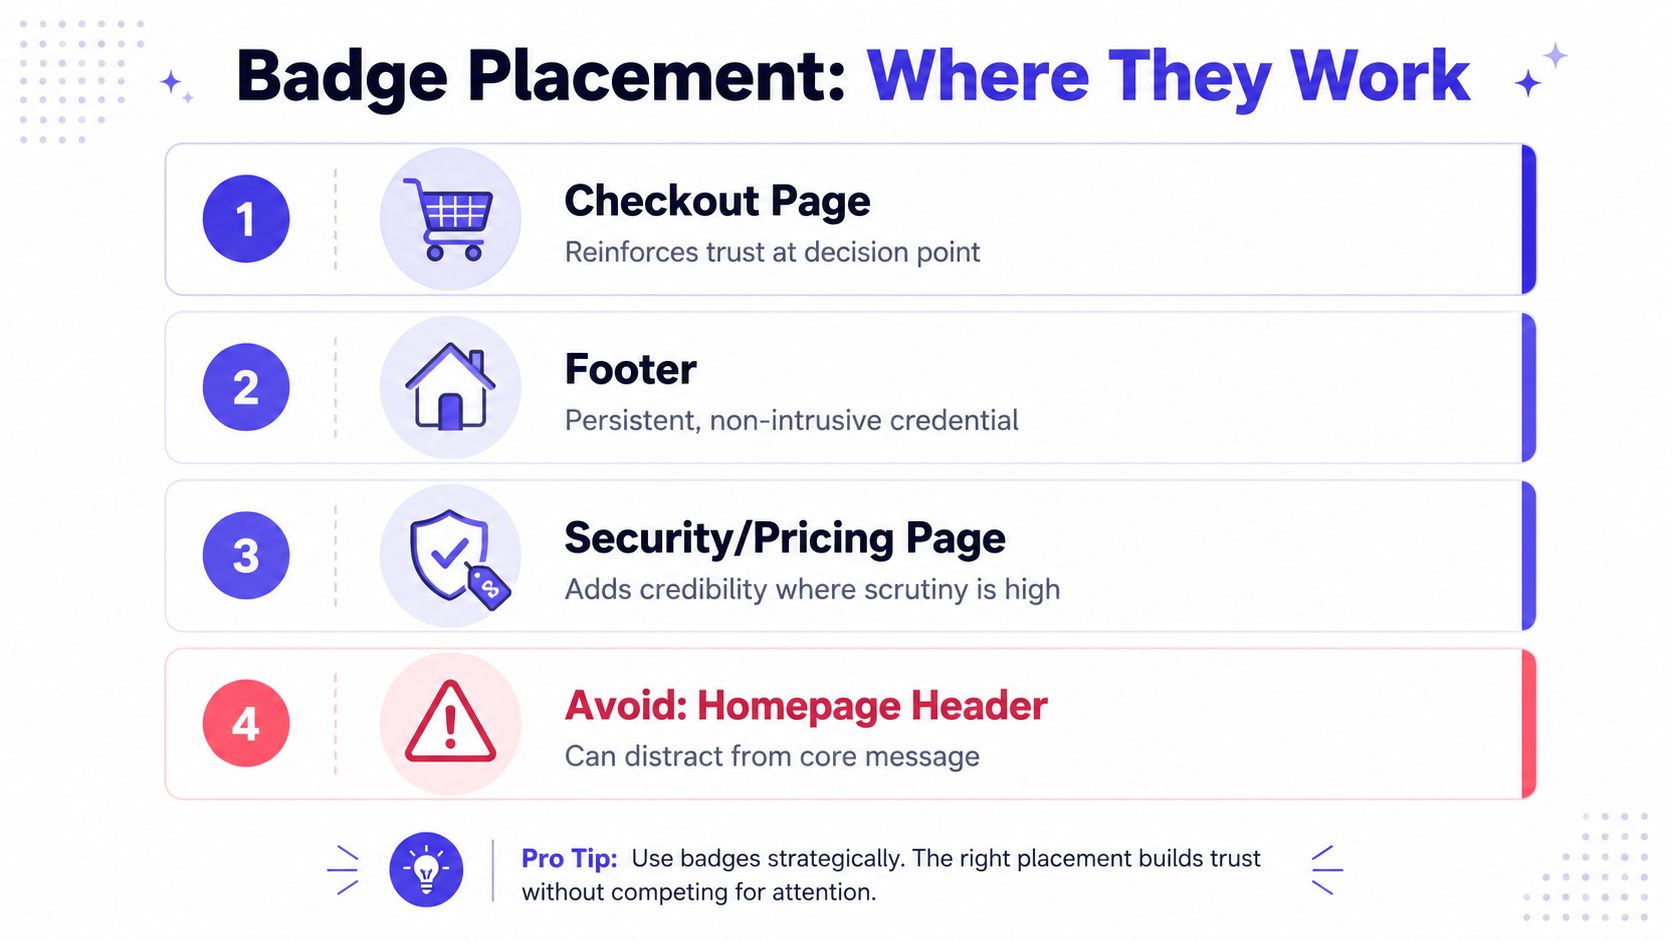
Badges do their best work when they answer a question at the moment it comes up. That's why checkout, cart, footer, and pricing pages keep showing up in placement guidance, while crowded headers and overstuffed hero areas usually underperform as trust surfaces.
Context beats decoration
A badge near checkout works because the visitor is making a decision right there. A badge in the footer works because it's persistent without interrupting the page. A badge on a security or pricing page can add credibility because scrutiny is already high. That same badge in the homepage header can feel like clutter, especially if it competes with the main value proposition.
The contrarian point matters here. A generic or oversized badge can read as decoration, not proof. If it looks like it was added to fill space, buyers often ignore it, or worse, they question why the page needs so much reassurance.
For broader conversion thinking, these social proof strategies for SaaS are a good companion read because the same principle applies, one clear signal beats a wall of seals. Badge placement should reinforce the decision moment, not drown it out.
Keep the signal narrow and readable
Most badge systems work better when the message stays short and specific. Overlapping trust seals, crowded icon rows, and giant footer graphics all raise the visual noise without adding much credibility. The strongest placements stay contextual and modest.
A simple rule works across most builds:
- Checkout and cart: reinforce confidence at the point of action.
- Footer: keep a credential visible without hijacking attention.
- Security or pricing pages: support the places where skepticism is highest.
- Homepage header: avoid unless the badge is part of the core product story.
The important thing is restraint. Badges earn their keep when they answer a specific visitor question, not when they try to act like a marketing banner.
Putting the Pipeline Together
The clean path is still the same. Define what the badge has to prove, generate the right category, issue the right format, then embed it where the visitor needs reassurance. If the badge is custom art, a prompt-driven AI generator makes sense. If speed matters, a template builder is easier. If you want no account and no friction, a self-hosted static generator is hard to beat.
The generator only gets you halfway there. The badge works when the destination URL is meaningful, the markup is accessible, and the placement matches the page's actual decision point.
If you're checking whether a site looks AI-built, custom, or somewhere in between, AI Website Detector gives you a fast way to inspect the stack behind the page. It's a practical fit for this workflow because badge strategy and site analysis often go hand in hand, especially when you're deciding what to show in a footer or verification block.